In this post we talk about the most popular method to improve your footwork in squash: the star drill.
The objective of this drill is to improve your stepping around the court and return to the T in the most efficient manner. In the process, it also strengthens your calf and quad muscles as quick stepping and lunging is involved.
How to Improve Squash Footwork
Drill Objectives
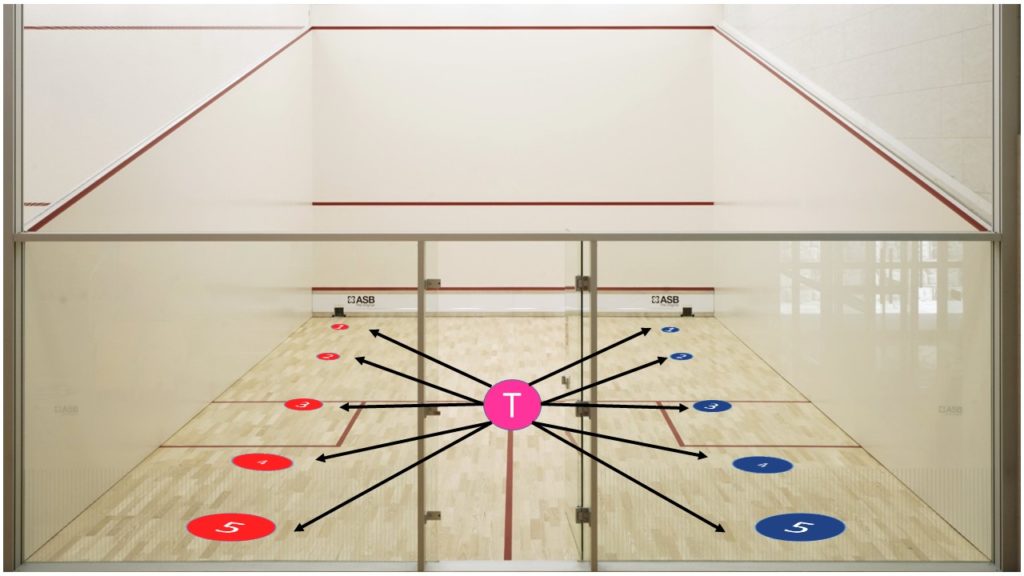
As shown below, a squash court has 10 different points that we regularly have to reach to hit our shots from; 5 on the forehand side, 5 on the back hand side:
- The two front corners
- Two middle-front areas where the ball tends to die in the nicks
- At the short line
- Just behind the service box
- The corners at the back for full length shots
Squash Footwork technique
As Ali Farag once said: Try to take the least number of steps when you are moving from the T to any area of the court. This will conserve more energy as compared you when you take several steps.
This footwork drill is to be done without a squash ball.
The idea is to explode off the T, get into one of the 10 positions, play an imaginary shot, and go back to the T. No laziness. These movements are to be done as fast as humanly possible, and with the least number of steps.
IMPORTANT: For the full effect of the game, come to a full stop whenever you return to the T. Do not move on to the next position immediately. Make sure you stop and do a split-step every time. This is what happens when you wait for your opponent to hit their next shot. In addition, this stop-and-go movement is also more tiring than just gliding around the court.
Each time, you want to move from the T to the 10 positions. You can in any order you feel like. Like 1 forehand, T, 1 backhand, T, 2 Forehand, T, 2 Backhand, and so on. You could also work on a specific set of positions several times before moving onto the next. Such as 1 forehand, T, 1 backhand, T, 1 forehand, T, 1 backhand, T, and so on.
You can also do this drill with a partner and have them point to random directions around the court. Then follow their lead. Time yourself.
The star drill
Front Corners
Standing at the T position, perform a split step and push yourself towards the front corner on the forehand side. Click here to learn more about the split step. Hold your racket up high behind your head. Try to get there in as few steps as possible. Do big lunges. Once you reach, play an imaginary shot. From that position we usually either play drives or drops. So swing your racket according to whatever shot you have in mind.
Without turning around, push yourself back towards the T. Try to use the same stepping pattern that you did when going from the T to this corner. This is the most efficient form of movement.
Note: It is preferred to move into the corners at a slightly curved trajectory as opposed going a straight line. Yes, the shortest path is a straight line but it takes space away from you as the ball is also popping out at an angle. You would rather attack the ball from a side-on position than a front-on one. See the image below for how you should move into the front corners.
Middle Front
This is where boasts die and loose drops end up. To really play an attacking shot, you really should get there as early as you can. Exploding off the T, take one or two steps, just as many as needed to be able to touch the wall with your racket and play an imaginary shot. Return to the T with the same stepping pattern.
The Short Line
This is where you either drive, drop, or hit volleys. With a quick split step, take one step only, and land on your front foot. Then play any shot you want imagining where the ball would be. Return to the T.
Behind the service box
Here is where the ball ends up when you can’t cut it off at the short line. This time you are going to split step and push yourself backwards towards the outside edge of the service box. It is okay to land on your back foot in this position. Take a swing without smacking your own knee. If you take a full swing, you can use the momentum of the racket to pull yourself back towards the T rather than pushing yourself towards it. This is how you can save energy and move fluidly like Fares Dessouky.
Back Corners
As we all know, this is where most of the game is played. Therefore, you have to perfect your movement into these areas so that you can always be in a balanced position to return a tight length ball. Like in the case of the front corners, you don’t want to move in a straight line as the ball will be coming out at an angle into your body. This is especially true if you opponent hits a deep cross court.
Split step off the T, and move towards the side wall as if you are going to cut off a straight drive to volley and then move backwards to the back wall as if the length is good and you have to let it bounce. You could also move towards the back wall first and then get into a position where to can touch the side wall with your racket. The former stepping pattern is for returning a straight drive while the latter is to return a cross court.
Recall the straight-drive-cross-court drill post that can help you think about the stepping pattern you should be doing.
Modes of the squash footwork drill
This drill may done in two different modes:
- Timed Mode: Set your stop watch to zero, and see how many rounds you can complete within 5, or 10 minutes. The objective here is to maximize the number of rounds you can complete within the time limit. This would make you move as fast as possible. Lets define a round as covering all ten points.
- Rep Mode: In contrast to the timed mode, you can decide how many rounds you want to complete and check later to see how long it took you. 10 rounds is a good start. Then you can work your way up to 20 rounds.
Watch this video as an example of a squash player performing the footwork drill at various points of the court. It is guaranteed that your Squash Footwork will improve if you do this regularly.
Want to improve your game? You gotta do drills! Check them out
